 Français
 English
Links and QRCodes for Payment
Context
Link to Receive Money
You want to cash a customer remotely. You want to send him a link so that he can send you money.
Link to Send Money
You want to send money to someone AND you want them to fill in the information required to collect the money themselves. So you send them a link to enter their phone number to collect their money.
One of the main advantages of this link is that you're not responsible if the user's phone number is entered incorrectly. You send money, yes, but by sending a link to the user, they enter their own phone number to collect their money.
In Details
Link to Receive Money
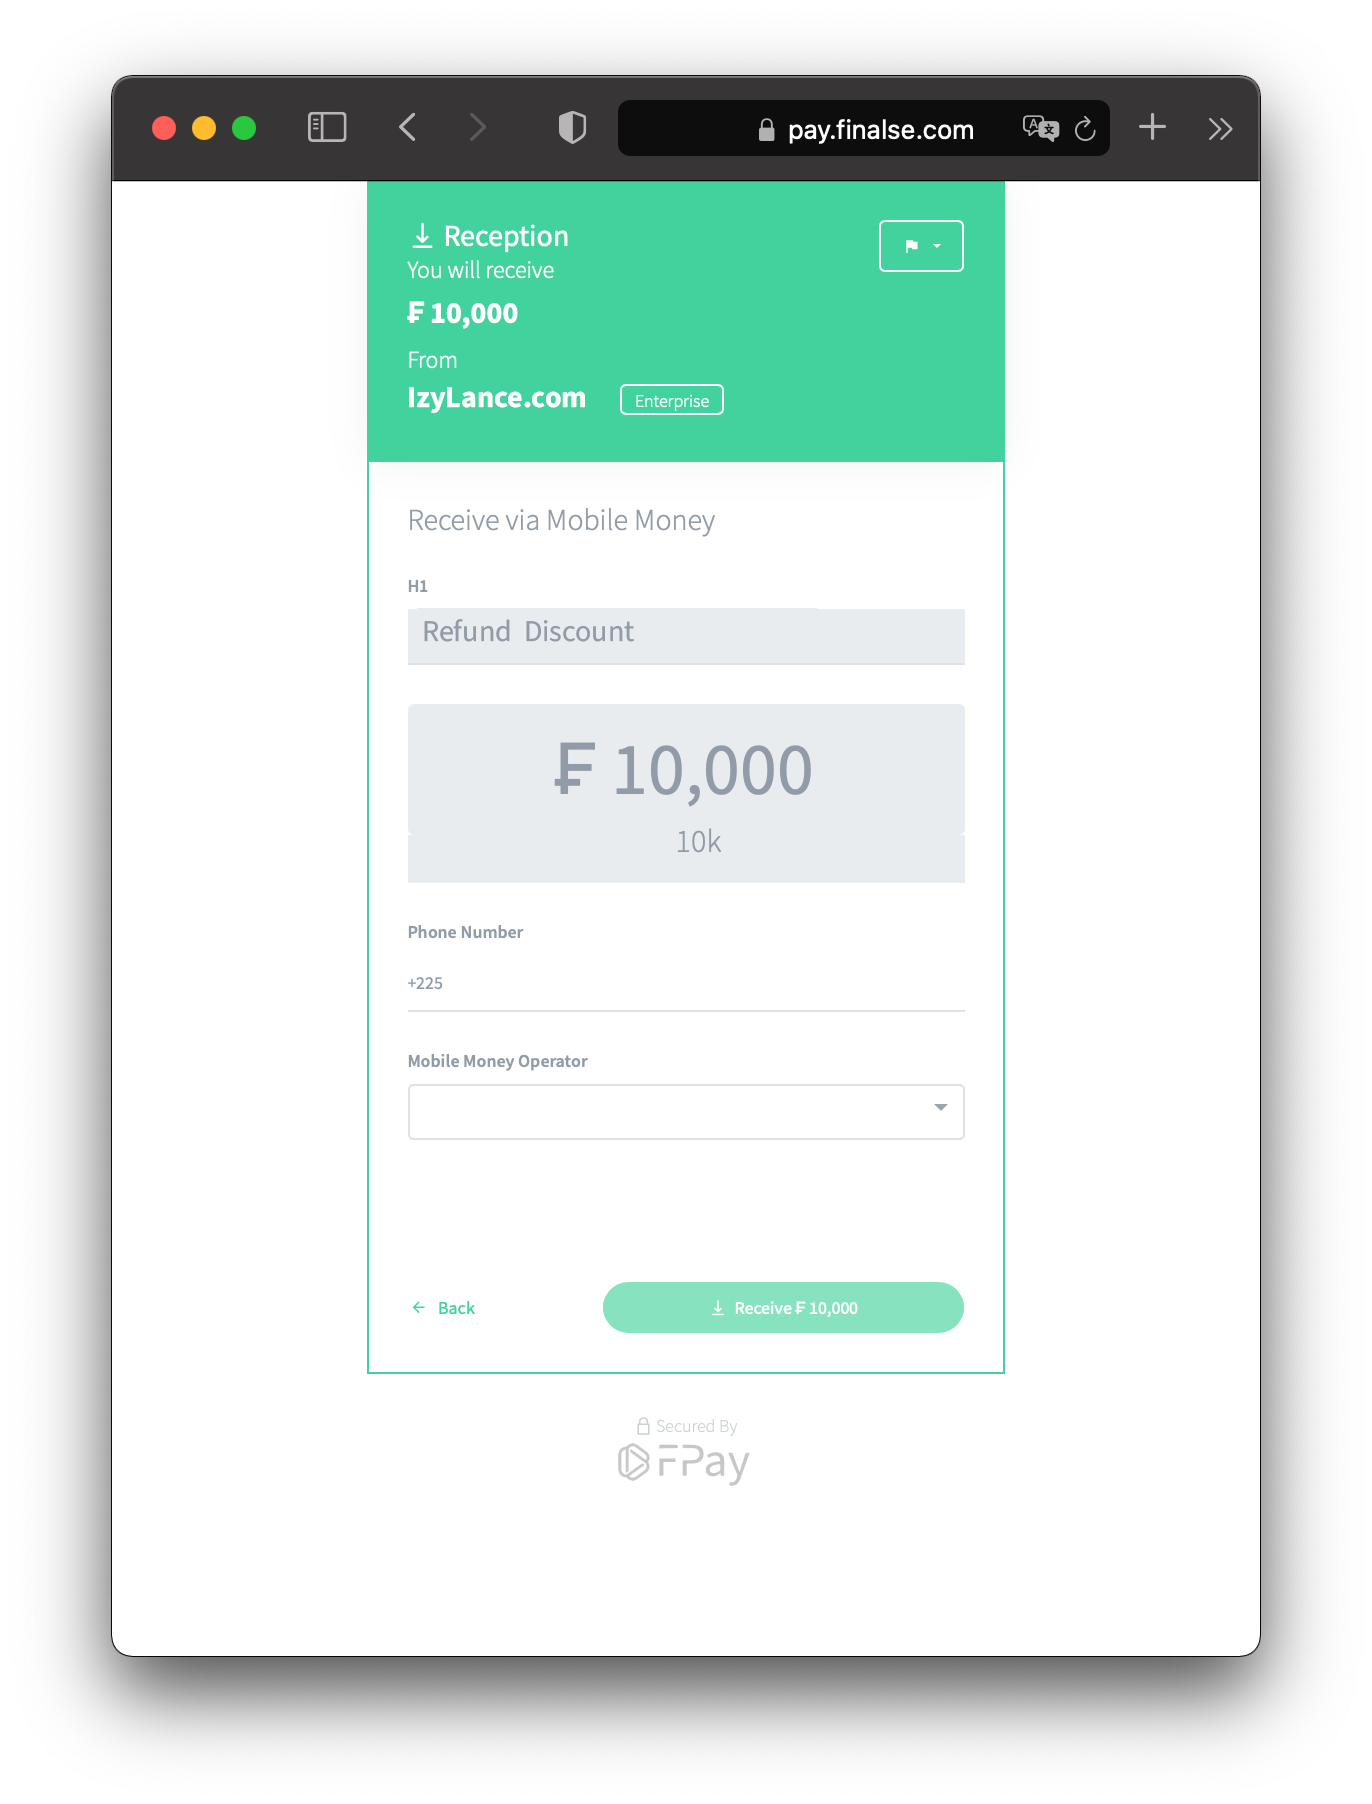
To receive money via a payment link, you need to create a FundRequest object that materializes a request for funds, a collection. This object contains a payment link and a Qr Code that can be scanned using a smartphone's camera. Once you've transmitted this link to your user, or presented them with the QRCode, they'll be taken to a page inviting them to pay, as illustrated in the following figure:
Link to Send Money
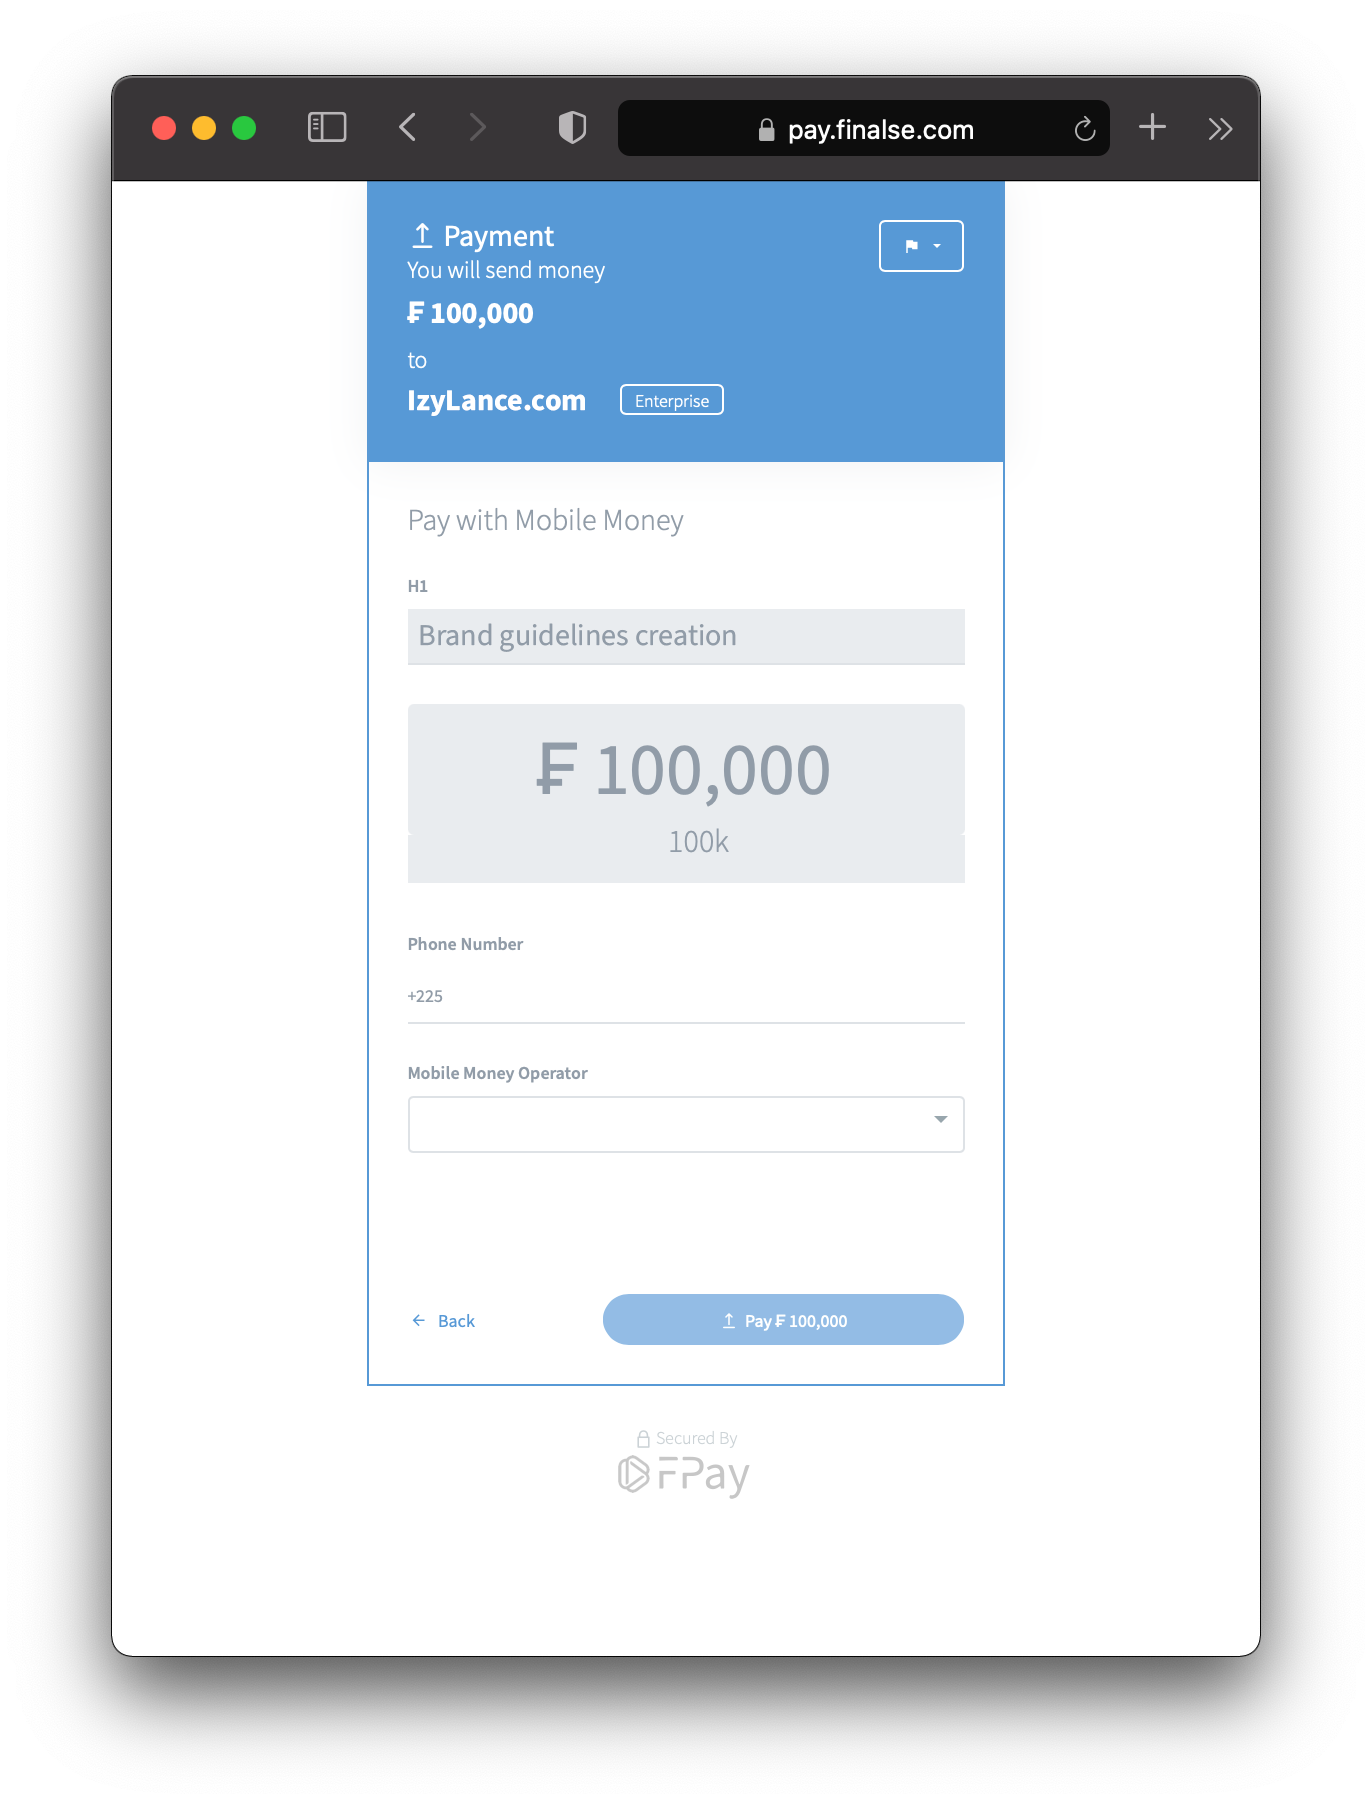
To send money via a payment link, you need to create a QuasiTranfer object that materializes a shipment of funds to be completed, hence the name "Quasi Transfer". In effect, you're saying the following to your user: I've sent you money, enter the mobile money number of your choice to collect it and complete the transfer.
This QuasiTranfer object contains a reclaim link and a Qr Codethat can be scanned using a smartphone's camera. Once you pass this link on to your user, or present them with the QRCode, they'll be taken to a page inviting them to collect their money, as illustrated in the following figure:
In the next section, we'll take a look at a few code examples that show how you can programmatically access the links and QrCodes for sending and retrieval.
Pre Requisites
This SDK requires
Node >=9.5
Authentication
We assume that you have of course opened your FPay account and that you are in possession of your token and your secretKey obtained during the creation of the
AuthAccess object as explained on the Authentication page.Initialization
In
AuthAccess object, the value of the field named secretKey must be kept absolutely secret and used only on your servers. This implies that you should never use the value of this field as a variable or constant in the source code of a mobile application, a web application or in the source code of any application whose binary may be public and visible to all. There are many tools to access strings in the source code from a binary around here.const fPay = sdk.FPayClient(sdk.Auth({token: '<token>', secretKey: '<secretKey>' }));Link & QRCode to Receive money
const fundRequestPromise =
    fPay.fundRequest.create({
        amount: "100_000 XOF",
        h1: "4x4 Car rental with driver"
    });
// Access the payment link
const paymentLink = fundRequest.securePay.link;// Access the QRCode image url
const qrCodeLink = fundRequest.securePay.qrCode.src;Link & QRCode to Send money
const quasiTransferPromise =
    fPay.quasiTransfer.initiate({
        amount: "10_000 XOF",
        h1: "Driver reimbursement"
    });
// Access the payment link
const paymentLink = quasiTransfer.securePay.link;// Access the QRCode image url
const qrCodeLink = quasiTransfer.securePay.qrCode.src;Going Further
Expires
When creating the QuasiTransfer and FundRequest objects , you can specify the time on which they expire.
Regarding the FundRequest object, This can be useful, for example, if you're making promotional offers and the payment of the user is about a limited reduced price.
It can also be useful if you're asking the user to pay for a reservation: You reserve the item for sale until the user has paid, after expire time, if the user has not paid yet, the item becomes available to another potential user.
In the case of the QuasiTransfer object, this is useful because on its creation, the money to be transferred is locked and is no longer accessible to you. After a long period, if the user has not retrieved the money, it will automatically be made available to you.
General Format
<after><space><$number><$timeUnit><on><space><$iso8601Datetime>neverFor
FundRequest object, the value never is the default value if none specified.For
QuasiTransfer object, the value 24h is the default value if none specified.Some examples of allowed values
"after 15m"- The funds request will expire 15 minutes after creation
"after 90s"- The funds request will expire 90 seconds after creation
"after 1h"- The created object will expire 1 hour after creation
"after 2d"- The created object will expire 2 days after creation
"after 1w"- The created object will expire 1 week after creation
"on 2028-05-19T01:13Z"- The created object will expire on May 19, 2028 at 01:13 GMT. The 'Z' at the end stands for GMT and this format is from ISO 8601.
"on 2028-05-19"- The created object will expire on May 19, 2028 at 00:00 GMT
"on 15:30"- The created object will expire at 15:30 GMT on the day of its creation.
If you submit a date in the past, the system will return an error.
The minimum time by which any object can expire is 1 minute.
How its works ?
QuasiTransfer
const quasiTransferPromise =
    fPay.quasiTransfer.initiate({
        amount: {
            currency: "XOF",
            value: "10_000"
        },
        expire: "after 45m"
    });
FundRequest
const fundRequestPromise =
    fPay.fundRequest.create({
        amount: {
            currency: "XOF",
            value: "10_000"
        },
        expire: "after 45m"
    });
Multi Language Support
When creating the QuasiTransfer and FundRequest objects, if you specify the h1 field , the value entered will be displayed to your user as the reason for payment. It is possible to specify a value in English and a value in French.In this way, the user will be able to change language, and the default language displayed will be that of his browser: If you're selling to an French-speaking user, the text entered in French will be displayed to him automatically.
How its works?
QuasiTransfer
const quasiTransferPromise =
    fPay.quasiTransfer.initiate({
        h1: {
            fr: "Paiement panier #12",
            en: "Shopping cart payment #12"
        },
        amount: {
            currency: "XOF",
            value: "10_000"
        }
    });
FundRequest
const fundRequestPromise =
    fPay.fundRequest.create({
        h1: {
            fr: "Paiement panier #12",
            en: "Shopping cart payment #12"
        },
        amount: {
            currency: "XOF",
            value: "10_000"
        }
    });
Destination
Whenever money is added to your account, the funds collected will be deposited in your main Wallet by default. Because you can create several additional Wallet , you can also choose where the funds arrives once the user has paid.
So, you can have one Wallet for your savings, or one Wallet per store if you have several stores, and choose where the funds received will go.
How it works ?
To specify the destination of the funds, you need the MARS of the Wallet, available vie the mars.alpha field.
For example, if the Wallet's MARS is "CI FPay W09POT", then you would enter the following code:
const fundRequestPromise =
    fPay.fundRequest.create({
        destination: "CI FPay W09POT",
        amount: {
            currency: "XOF",
            value: "10_000"
        }
    });
Source
Whenever you send money out of your account, the funds sent will be taken from your main Wallet by default. Because you can create several additional Wallet , you can also choose the source of the funds to be sent.
So, you can have one Wallet for your savings, or one Wallet per store if you have several stores, and choose where the funds to be transmitted will be taken from.
How it works ?
To specify the source of the funds, you need the MARS of the Wallet, available vie the mars.alpha field.
For example, if the Wallet's MARS is "CI FPay W09POT", then you would enter the following code:
const quasiTransferPromise =
    fPay.quasiTransfer.initiate({
        source: "CI FPay W09POT",
        amount: {
            currency: "XOF",
            value: "10_000"
        }
    });
Fees Payer
By default, transactions fees are paid by your customer. You can specify specify who pays them to change this default behavior according to the situations you need to manage.
For example, suppose you want to make a cash inflow to your FPay account in the amount of ₣ 10,000 The question you need to ask yourself is How much money my user should pay ? If the answer is ₣ 10,000, then then you pay the fees.
You can also ask the question the other way around: How much money should arrive on my FPay account? If the answer is ₣ 10,000, then it's your user who will pay the fees.
To specify who pays the fees, 4 values are possible:
"Me"- You pay the fees
"CounterPart"- Your user (the counter part) pays the fees
"Sender"- Whoever sends the money pays the fees, whether it's you or your user
"Receiver"- Whoever receives the money pays the costs, whether it's you or your user.
Code example
QuasiTransfer
const quasiTransferPromise =
    fPay.quasiTransfer.initiate({
        fees: {
            payer: "CounterPart"
        },
        amount: {
            currency: "XOF",
            value: "10_000"
        }
    });
FundRequest
const fundRequestPromise =
    fPay.fundRequest.create({
        fees: {
            payer: "CounterPart"
        },
        amount: {
            currency: "XOF",
            value: "10_000"
        }
    });
Foreign ID
When creating the QuasiTransfer and FundRequest objects, you can attach your own internal ID. In this way, When retrieving the QuasiTransfer and FundRequest objects, you will be able to use your own id instead of the one generated by FPay. The ID you submit must be unique for each object type.
One of the advantages of submitting your own unique identifier is that you can carry outidempotent queries. In fact, if your submitted foreignId is unique, then you're protected against duplications due to networks, for example, and you'll be able to control retries without worrying about repeating the same operation several times.
For creation
QuasiTransfer
const quasiTransferPromise =
    fPay.quasiTransfer.initiate({
        foreignId: "<my internal id>"
    });
FundRequest
const fundRequestPromise =
    fPay.fundRequest.create({
        foreignId: "<my internal id>"
    });
At retrieval
With the previous code, you now have the right to do the following code to retrieve QuasiTransfer and FundRequest objects.
QuasiTransfer
const quasiTransferPromise = fPay.quasiTransfer.get("<my internal id>");FundRequest
const fundRequestPromise = fPay.fundRequest.get("<my internal id>");Foreign Data
When creating QuasiTransfer and FundRequest objects, you can add your own data to tag the object you've created.
For example, you can add the following data:
-
{"myKey": 19, "myOtherKey": "myOtherValue"} -
<xml><myKey>myValue</myKey></xml> -
myValue1, myValue2, myValue3 - Any string you like, as long as it doesn't exceed 255 characters.
On creation
QuasiTransfer
const quasiTransferPromise =
    fPay.quasiTransfer.initiate({
        foreignData: "<xml><myKey>myValue</myKey></xml>"
    });
FundRequest
const fundRequestPromise =
    fPay.fundRequest.create({
        foreignData: "<xml><myKey>myValue</myKey></xml>"
    });
When retrieving
QuasiTransfer
const quasiTransferPromise = fPay.quasiTransfer.get("<quasiTransfer.id | foreignId>");quasiTransferPromise.then(quasiTransfer => {
// Inspect the 'foreignData' field of the QuasiTransfer ...
const xmlData = quasiTransfer.foreignData;
// xmlData = "<xml><myKey>myValue</myKey></xml>"
});FundRequest
const fundRequestPromise = fPay.fundRequest.get("<fundRequest.id | foreignId>");fundRequestPromise.then(fundRequest => {
// Inspect the 'foreignData' field of the FundRequest ...
const xmlData = fundRequest.foreignData;
// xmlData = "<xml><myKey>myValue</myKey></xml>"
});